 SpeechPilot
SpeechPilot — Manual
Dictate instead of typing: what you say goes into the field the cursor sits in. This manual covers everything the extension does — from the first click to macros, the bar and licences.
- Getting started
- Dictating
- Speaking punctuation
- Settings
- Replacements
- Emoji
- Macros
- The bar
- Backup
- Licence
- Privacy
- When something goes wrong
- Keys and clicks
1. Getting started
Installing
Open SpeechPilot in the Chrome Web Store and click Add. For new extensions Chrome shows the notice “Enhanced Safe Browsing doesn’t trust this extension yet”. That is normal for any fresh store listing and clears up over time on its own — click Add anyway.
Switching on
Open the website you want to write on and click the SpeechPilot icon in the Chrome toolbar. The microphone button appears at the bottom right of the page. Clicking the icon again hides it.
SpeechPilot is only active on the tab you switched it on in. A new tab needs a new click.
Allowing the microphone
The first time you switch on, Chrome asks for the microphone. The prompt is at the top, in the address bar — answer with Allow. Without it there is no dictation. The permission then stays, and it is requested by SpeechPilot itself, not by the website.
If you clicked Block by mistake: click the lock or slider icon on the left of the address bar and allow the microphone there.
Pinning the icon
If the icon is not visible, click the puzzle piece at the top right of Chrome and pin SpeechPilot.
Opening the settings
Right-click the SpeechPilot icon → Options. That is where all the tabs live: settings, macros, emoji, replacements, bar, licence and this help.
2. Dictating
How it goes
- Click into the field you want to write in — the cursor has to be blinking in it.
- Click the microphone button or press Ctrl+Shift+Y.
- Speak. The text appears in the field as you go.
- Click again, or press the shortcut, to switch the microphone off.
Text always goes into the field the cursor sits in. Click into another field in between and SpeechPilot carries on writing there.
Enter
While text is still being processed, SpeechPilot holds the Enter key back so half a message never goes out. Hence the rule of thumb: the first Enter commits the sentence, the second sends it. When nothing is pending, Enter works as usual straight away.
Capitals
At the start of a sentence, after . ! ? and after a line break, the next word is capitalised. SpeechPilot does that on its own, in every licence tier.
Password fields
Dictation never writes into password or payment fields. The attempt is refused with a short notice.
Where it works
In ordinary input fields, text areas and most chat editors. Not on Chrome's own pages (chrome://…, the Web Store) or in the PDF viewer — Chrome lets no extension write there.
3. Speaking punctuation
These words are turned into characters as you dictate. They are built in and work in every tier, including the free version.
| Spoken | Written |
|---|---|
| full stop / period | . |
| comma | , |
| question mark | ? |
| exclamation mark / exclamation point | ! |
| colon | : |
| semicolon | ; |
| hyphen | - |
| dash | – |
| open bracket / close bracket, open parenthesis / close parenthesis | ( ) |
| open quote / close quote | “ ” |
| new line | line break |
| new paragraph | blank line |
The words follow the recognition language (Settings → Recognition language): dictating in German you say Komma, in Spanish coma. The list for the selected language is shown under Replacements. Your own entries there take precedence over the built-in ones.
Spacing is handled for you: no space before . , ! ? : ; ) and none after ( or a line break.
4. Settings
Every switch in the first tab takes effect immediately, with no saving.
| Setting | What it does |
|---|---|
| Interface language | The language of the settings page and of the buttons on the website: German, English, Spanish, or "same as the browser". Takes effect at once and has nothing to do with recognition. |
| Recognition language | The language you speak. Available: 69 languages in 119 regional variants. Spoken punctuation works in German, English, Spanish, French, Italian, Dutch, Polish, Portuguese, Romanian, Turkish, Russian, Ukrainian and Filipino. A change takes effect the next time you switch the microphone on, not mid-sentence. |
| Replace ß with ss | Swiss spelling. Applies to macros and bar texts as well. |
| Capitalise after an emoji | An emoji usually ends a sentence. Turn it off if you often use emoji mid-sentence. |
| Show the microphone button on the page | With it hidden, everything runs through the toolbar icon or the keyboard shortcut. |
| Show the macro bar on the page | Shows the most recently used macro per letter group. The bar can be dragged. |
| Keyboard shortcut | The default is Ctrl+Shift+Y. Chrome manages shortcuts itself, so "change" takes you to chrome://extensions/shortcuts. |
| Backup | Exports and imports everything in one file — see Backup. |
5. Replacements Standard
What you say on the left is written on the right. Made for technical terms, proper names and anything recognition keeps getting wrong.
Adding one
- Open the Replacements tab and click Add row.
- The spoken word on the left, the text that should appear on the right.
- Save — changes only apply after that.
Worth knowing
- Whole words only. "house" does not replace the first five letters of "houseboat".
- Umlauts and case don't matter. "für" and "fuer" hit the same entry.
- Several words are fine too: "kind regards" → a whole sign-off.
- The built-in punctuation is listed at the bottom of the tab. You don't have to add it — and your own entry overrides it.
6. Emoji Standard
A spoken word becomes a character — useful for everything you cannot dictate.
- Emoji tab → Add row.
- The word on the left, for example thumbs. The character on the right: type it, open the Windows emoji keyboard with Windows+., or pick one from the small selection under ▾.
- Save.
Use words you would not otherwise dictate, or an emoji will turn up mid-sentence. Umlauts and case are ignored, as with replacements.
Whether the next word is capitalised after an emoji is set in the first tab.
7. Macros Complete
Macros are stored texts that answer to a short code: say the code, the whole text appears.
Codes
A code is a letter plus a number, for example A1. "A one" and "A 1" are recognised too — speech recognition writes numbers differently depending on its mood, so SpeechPilot checks every form. Number words up to twelve are turned into digits.
The settings page warns you when two codes sound the same when spoken — otherwise one would hide the other.
Creating them
- In the settings: Macros tab → + New macro, enter code and text, Save.
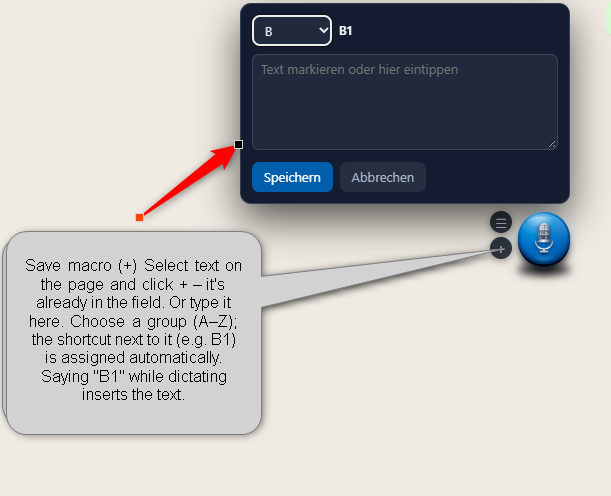
- As you go: select text on the website and click the + next to the microphone button. The text is already in the field. Choose a group (A–Z) — the code next to it, e.g. B1, is assigned in order.
Locking
So the same text does not go out twice when you misspeak, a used macro can be locked: off, 1, 5 or 15 minutes, 1 or 8 hours, or until reset. The timed options release the macro on their own; with "until reset" it stays locked until you release it under Release locks — either one letter group or all of them. The count of how often a macro has been used is kept.
Keeping the list in order
- Search and first letter filter the view; long lists are spread across pages.
- Find duplicates shows macros with identical text.
- Delete shown removes exactly what the current filter displays — that cannot be undone.
Saving and importing
Save macros and Import macros deal with macros only, separately from the general backup. On import, SpeechPilot asks what should happen:
| Replace everything | The existing set is discarded. |
|---|---|
| Add | The file is added to what is there. |
| Add without duplicate texts | As above, but macros whose text already exists are left out. |
For space reasons macros live on this computer only and do not travel through Chrome sync. Saving and importing is how they reach a second device.
The macro bar
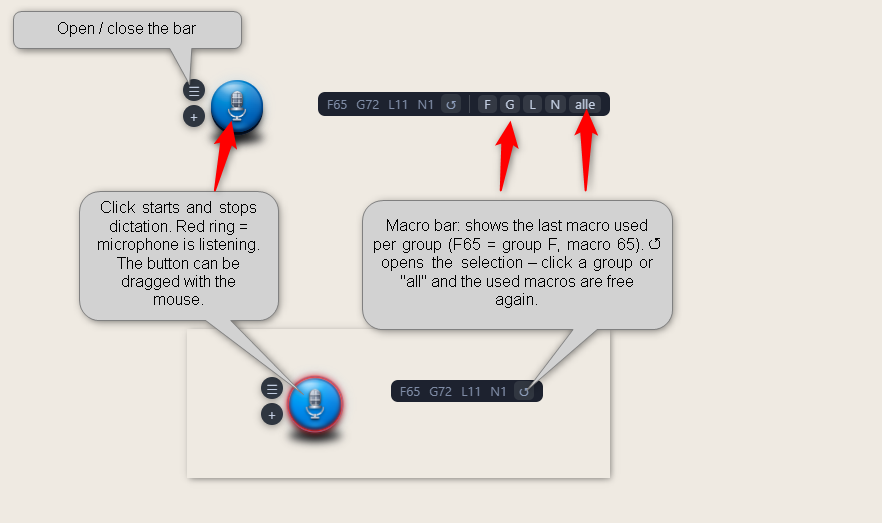
Switched on in the first tab, it shows the most recently used macro per letter group (F65 = group F, macro 65) and can be dragged around. ↺ opens the group selection: click a group or "all" and the used macros are free again. Shift+click removes a group from the display.
Please note: some platforms have rules about whether and how pre-written texts may be used. Check the rules of the site you work on and follow them — that responsibility is yours.
8. The bar Complete
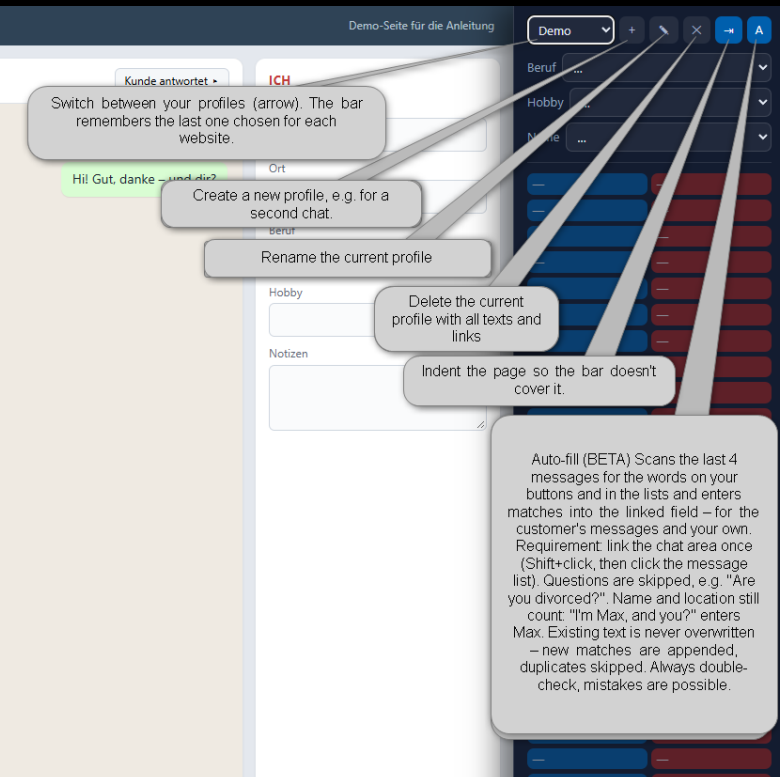
The bar is the button strip on the right edge of the page. The ☰ next to the microphone button shows and hides it. At the top it holds the profile selector, below that three drop-down lists, the text buttons and, at the very bottom, the Customer / Me block.
The top row
| Selector | switch between your profiles. The bar remembers the last one chosen for each website. |
|---|---|
| + | create a new profile, e.g. for a second chat |
| ✎ | rename the current profile |
| ✕ | delete the current profile with all its texts and links |
| ⇥ | indent the page so the bar doesn't cover it |
| A | switch auto-fill on and off (see below) |
Text buttons
Each row has a blue (left) and a red (right) button, each with its own text.
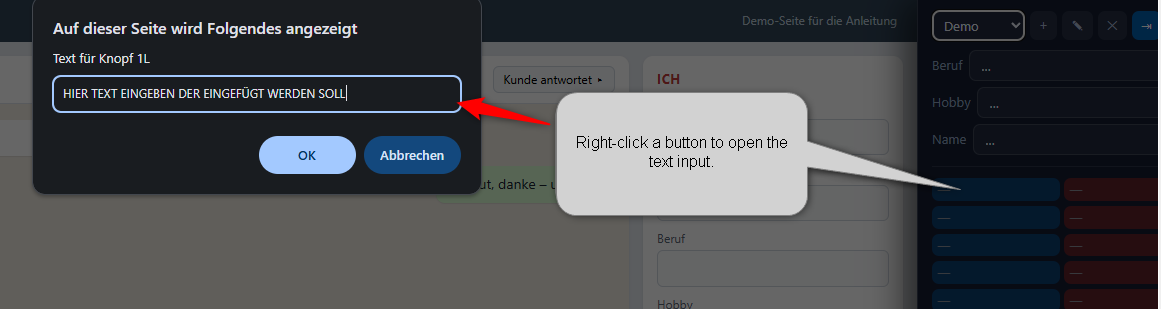
- Setting the text: right-click the button. A button that is still empty (—) opens the input on an ordinary click as well.
- Deleting the text: clear the input and press OK. Cancel leaves the text as it is.
- Using it: click — the text is appended to the linked field. Without a link the bar says "No field linked".
Linking a field
To make a button always write into the same field:
- Shift+click the button or the list.
- Click the field on the page. Esc cancels.
Alt+click releases the link again. Which button writes into which field is up to you — the colours are only there to help you find your way. Hover over a button to see the number of its field.
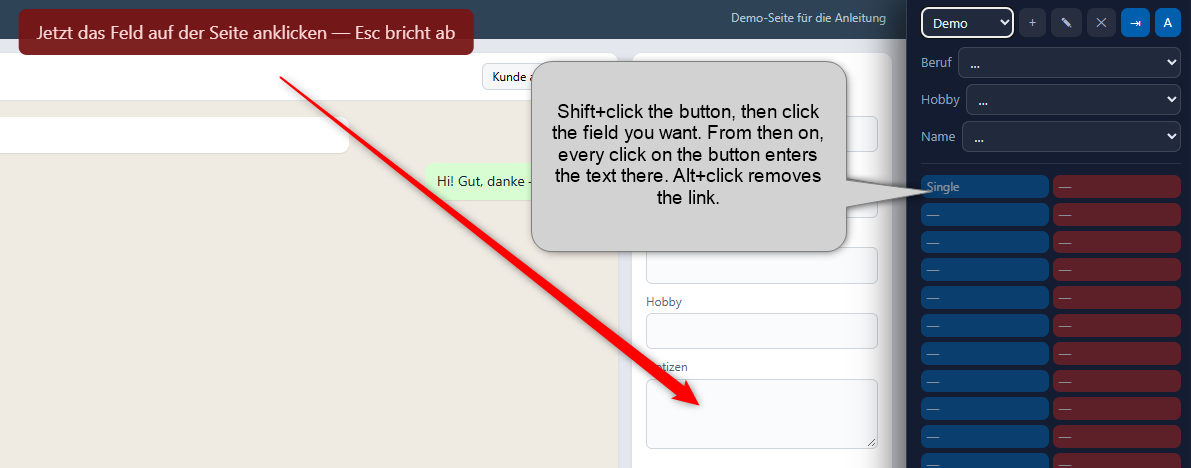
What is remembered is the field's position, not its name — websites change names all the time. If the page shows or hides a field, the positions shift and the link has to be set again. That is what "field no. 3 does not exist on this page" means.
The three lists
Occupations, hobbies and names are maintained in the settings, in the Bar tab: one entry per line. On saving, blank lines and duplicates are removed and everything is sorted alphabetically. The lists are shared by all profiles.
An entry from a list goes into the linked field. The occupation and hobby choosers close by themselves after a few seconds, or straight away with a second click, Esc or a click on the page.
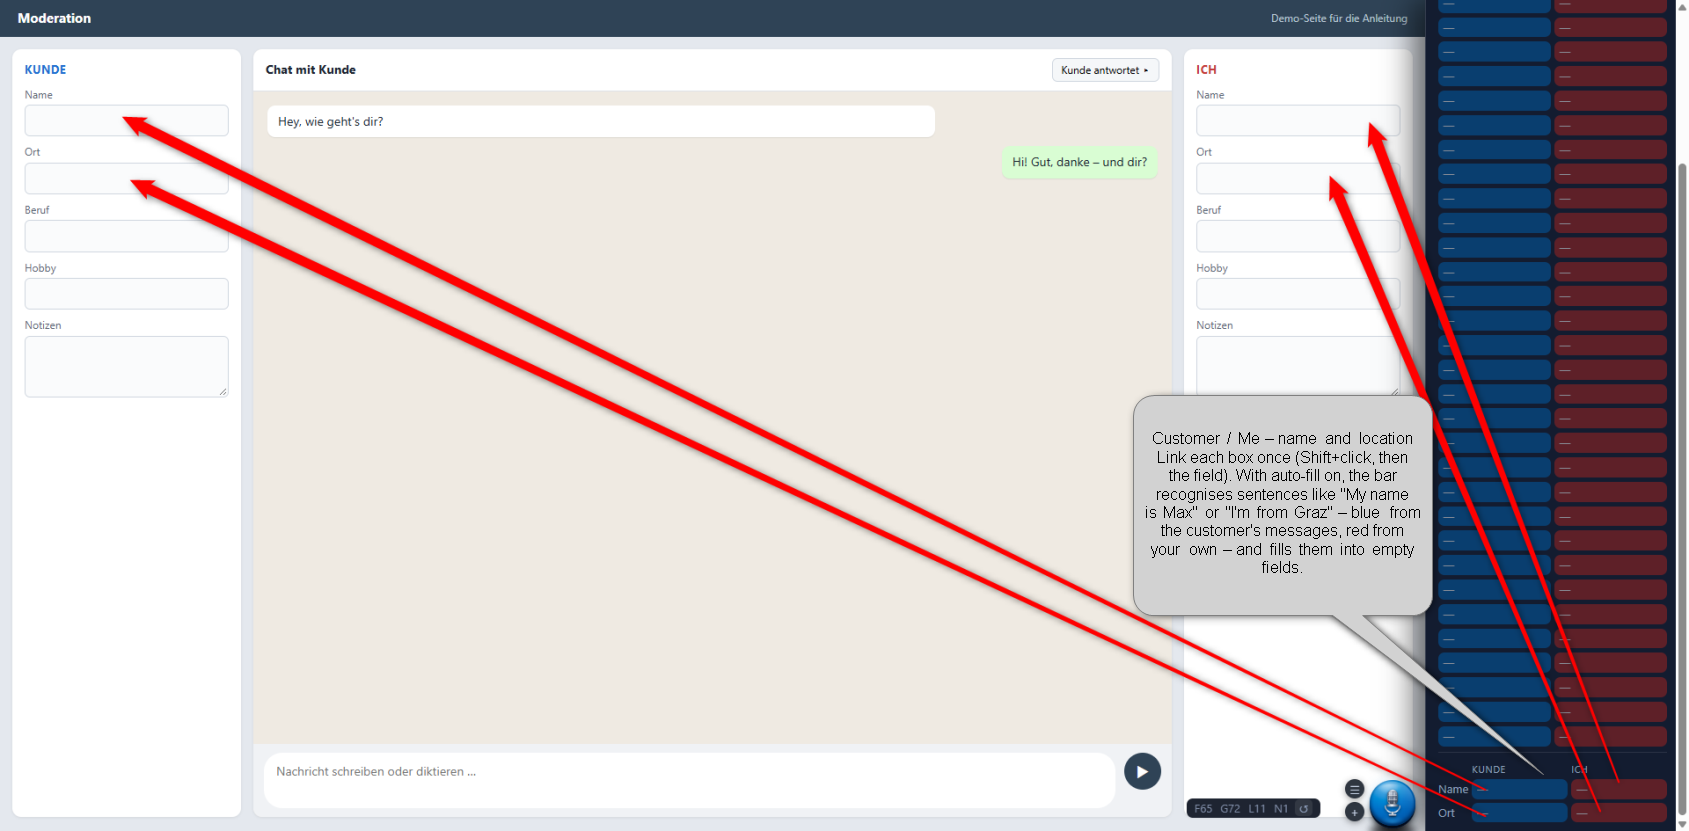
Customer / Me — name and location
At the bottom of the bar, name and location appear twice: on the left (blue) for the customer, on the right (red) for you. Link each box once (Shift+click, then the field). With auto-fill on, the bar recognises sentences like "My name is Max" or "I'm from Graz" — blue from the customer's messages, red from your own — and fills them into empty fields. Clicking a box writes its value into the field by hand.
Auto-fill Beta
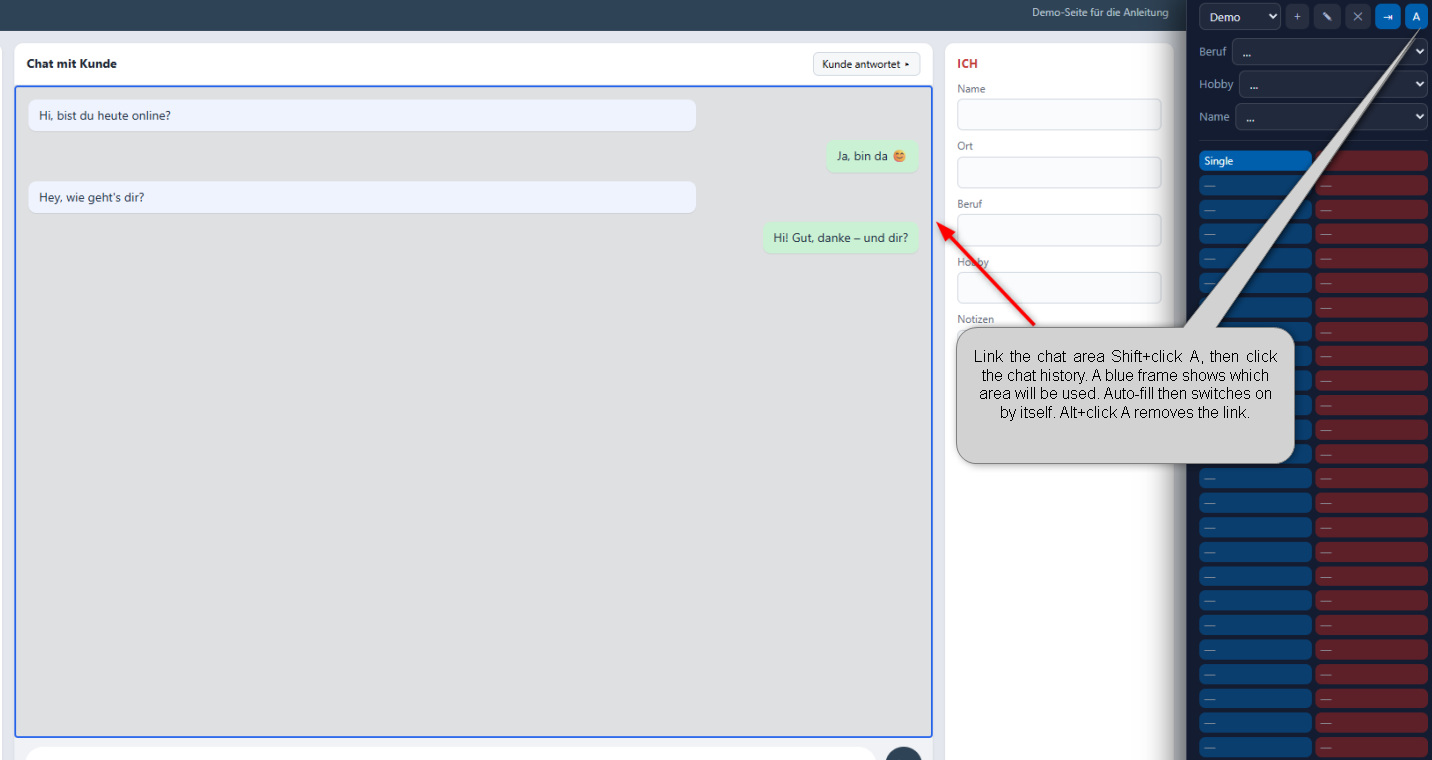
Switched on with A, the bar scans the last four messages for the words on your buttons and in the lists and enters matches into the linked field — for the customer's messages and your own.
- Requirement: link the chat area once. Shift+click A, then click the chat history. A blue frame shows which area will be used. Auto-fill then switches on by itself. If no area is linked yet, a plain click on A asks for it.
- Best linked in a chat with at least three messages — with fewer, the frame tends to grab too much.
- Questions are skipped, e.g. "Are you divorced?". Name and location still count: "My name is Max, and you?" enters Max.
- Existing text is never overwritten — new matches are appended, duplicates skipped.
- Alt+click A releases the chat area link.
Always double-check: auto-fill is a help, not a replacement for your own eyes. Mistakes are possible, especially with chat slang and questions without a question mark.
Space
The width of the bar can be dragged at its left edge. ⇥ pushes the website aside instead of letting the bar sit on top of it.
9. Backup
In the first tab, export writes everything into one file: emoji, replacements, macros, the bar with its profiles, and all settings.
import replaces the entire set — you are asked first. If you only want to move macros, use the separate route in the Macros tab; when SpeechPilot recognises a pure macro file on import, it says so instead of wiping everything.
Make a backup before larger changes. It is also the way onto a second computer.
10. Licence
Dictation, the built-in punctuation and capitalisation are always included — even without a licence.
| Tier | Includes |
|---|---|
| Free version | Dictation, built-in punctuation, capitalisation. |
| Standard | Plus your own replacements and your own emoji words. |
| Complete | Plus macros and the bar on the page. |
Unlocking
Enter the key from the email you got after buying into the Licence tab and click Unlock. The key stays on this device and is re-checked at most once a day.
Without a connection
If the licence server cannot be reached, the last confirmed tier keeps working for another 14 days. Only after that does it fall back to the free version, until the next check succeeds.
Changing device
Every key has a limited number of activations; the count is shown in the Licence tab. Remove licence frees the slot again — the same key can then be entered on another computer. If the server was unreachable at that moment, the slot is freed at the next opportunity.
What happens to locked content
Nothing is lost. Macros and bar texts stay stored, they are simply not used without the matching tier. After unlocking they are available immediately, with no need to reload the page.
11. Privacy
- Recognition is done by Chrome using Google's speech recognition — as in most dictation extensions.
- It runs in a shielded part of the extension, not in the website: the page sees neither your audio nor the recognised text — only what is written into its input field.
- SpeechPilot stores neither the recording nor the recognised text.
- Settings, replacements and emoji live in Chrome sync; macros stay local to this device.
- No account, no sign-in. The only thing that leaves your computer is the licence check, at most once a day.
The full statement is at speechpilot.vip/en/datenschutz.html.
12. When something goes wrong
| What you see | Cause and remedy |
|---|---|
| No microphone button | SpeechPilot is not switched on for this tab (click the icon), or the button is hidden in the settings. On chrome:// pages and in the Web Store, Chrome allows no extension at all. |
| Nothing happens when you speak | The microphone has not been allowed — the prompt is in the address bar. Otherwise allow it via the icon on the left of the address bar. |
| Text lands in the wrong field | The cursor was elsewhere. Click into the field you want; for fixed targets, link the bar's buttons. |
| "Dictation does not write into password or payment fields" | That is intended. |
| "The text could not be inserted here" | The field refuses text from outside — usually a special editor. There, typing is the only way. |
| Enter does not send | Text was still being processed; that Enter committed it. The next one sends. |
| A macro does not come out | It is locked ("already used") — Release locks in the Macros tab. Or recognition wrote the code differently: look at the text in the field and add a second code if needed. |
| A bar button writes into the wrong place | The page showed or hid a field, so the position no longer matches. Set the link again with Shift+click. |
| Two microphone buttons | Can happen after an update while the tab was open. Reload the page. |
| Changes to replacements or emoji have no effect | Don't forget Save — unlike the switches in the first tab, the lists only apply afterwards. |
| "Not saved: the list is too long" | Chrome sync has a size limit. Shorten or split the entries. |
| Everything is locked | Check the Licence tab: is a key entered? When was it last checked? After 14 days without a connection the tier falls back. |
13. Keys and clicks
| Ctrl+Shift+Y | Turn dictation on and off (changeable in Chrome) |
|---|---|
| Click the toolbar icon | Show/hide SpeechPilot on this tab |
| Click the microphone button | Microphone on and off |
| + next to the microphone button | Save selected text as a macro |
| ☰ next to the microphone button | Show and hide the bar |
| Right-click a bar button | Change its text |
| Shift+click a button or list | Link a field |
| Alt+click a button | Release the link |
| Shift+click on A | Link the chat area |
| ↺ in the macro bar | Lift the locks of one group or all |
| Shift+click in the macro bar | Hide a group |
| Esc | Cancel linking |
| Windows+. | Windows emoji keyboard |